Step into a kitchen in central Mexico around 1700. Wheat is no longer a novelty, but it’s not exactly everyday food either. Maize still rules the table, but in cities and growing towns, especially around places like Lake Texcoco, you start to see something new. Small, lightly sweet wheat breads showing up in bakeries and homes.
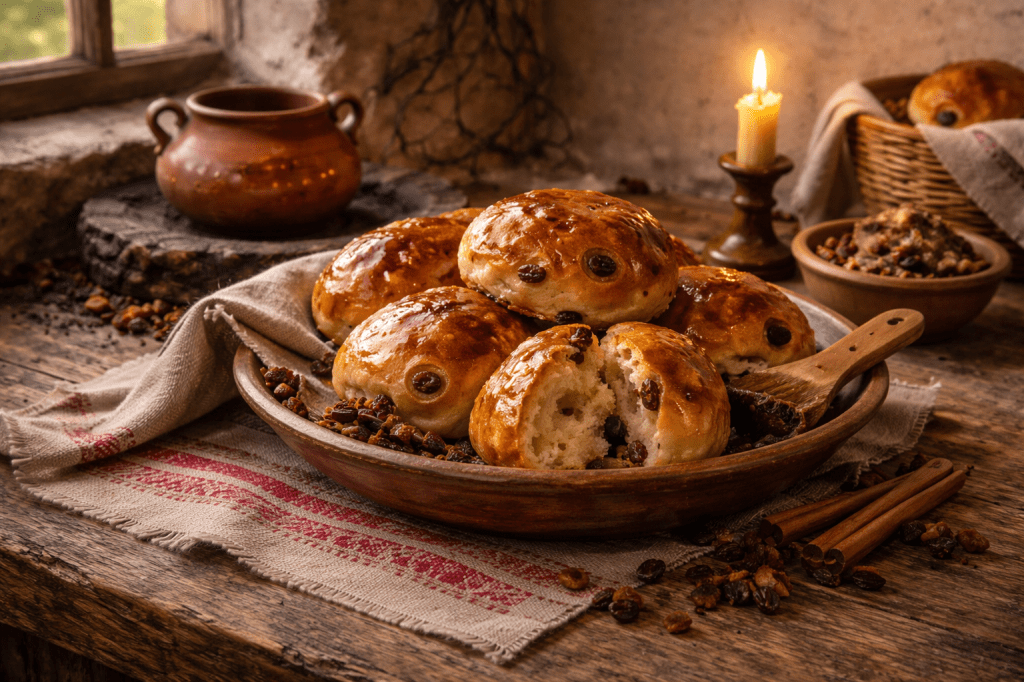
These kinds of rolls sit right at that cultural crossroads. They’re not fully “pan dulce” the way we think of it today, but they’re also not just plain bread. Ingredients like piloncillo, cinnamon, anise, and raisins reflect both global trade and local adaptation. Sugar from cane, spices from across the Atlantic, wheat from Spanish agricultural systems, all coming together in something that feels simple, but actually tells a much bigger story.
And realistically? This wasn’t everyday food for most people. This is the kind of thing you might pick up from a local bakery, share with family, or enjoy when you wanted something just a little special. Think less “daily staple” and more “oh nice, we got bread today.”
There isn’t really one exact recipe for these from 1700, so this is my best reconstruction based on ingredients and methods from the time.
Now, let me be honest with you.
These turned out great… but I absolutely messed them up.
I completely forgot to add the piloncillo syrup.
I make bread often enough that I know what dough is supposed to feel like, and after mixing everything together I could tell this was not it. It was dry, crumbly, and honestly kind of confusing. I looked back over the recipe and didn’t see anything I missed (yup… I’m blind… it was there). So I did what you do when you trust your instincts a little too much. I started adding water. A tablespoon at a time. Then more. And more. And at some point I was like… this feels like a lot, but okay, we’re committing.
I finally got it to a good dough texture, kneaded it, let it rise, shaped the rolls… and then… lightbulb moment.
I forgot the sugar.
At that point there was no going back. So instead of trying to fix it and potentially ruin everything, I pivoted. I reduced the piloncillo syrup and brushed it on as a glaze after baking.
And honestly? It worked.
I do want to remake these properly one day? Yes. Will I? Probably. But between a full-time job and a family, I don’t always have time to redo things just for perfection. So this is the version that happened in real life.
And for what it’s worth, they were still really good. My husband said they tasted like a cinnamon raisin bagel, which honestly feels like a win.
So if nothing else, this is proof that even when you mess up historical recipes, you can still end up with something worth sharing.
Servings: 10–12 rolls
Estimated Time: ~2 hours 30 minutes (including rise time)
Before You Start (Real Talk)
This is a slightly modernized version of a 1700s recipe. I’m using active dry yeast here because I like you, I value my time and sanity.
Historically, this would’ve relied on wild fermentation, which is cool in theory and… a whole lifestyle in practice.
So yes, this is not 100% historically accurate. But it is historically inspired, doable in a normal kitchen, and still very much in the spirit of the time.
Ingredients
A Quick Note on the Ingredients: If there’s an ingredient below that doesn’t appeal to you or isn’t available at your store, don’t stress, just skip it, find a similar substitute, or let this recipe inspire you to add your own twist. Back in this time period, recipes didn’t exist in the structured way we know them today. People used whatever they had on hand, and measurements were more of a “feel it out” situation. So embrace the spirit of the age and make it yours!
- 440 g (3½ cups) whole wheat flour
- 7 g (2¼ teaspoons / 1 packet) active dry yeast
- 5 g (1 teaspoon) salt
- 2 g (¾ teaspoon) ground cinnamon
- 2 g (¾ teaspoon) crushed anise seed
- 75 g (½ cup) raisins
- 150 g (¾ cup packed) piloncillo, grated
- 180 ml (¾ cup) water, for syrup
- 120 ml (½ cup) warm water or milk
- 30 g (2 tablespoons) lard
- 1 egg (optional, for a softer texture)
Instructions
1. Make the piloncillo syrup
In a small pot, combine the piloncillo and 180 ml water (¾ cup).
Simmer until fully dissolved, then let cool until warm (not hot).
2. Activate the yeast
In a bowl, combine:
- 120 ml warm water or milk (½ cup)
- 15 ml piloncillo syrup (1 tablespoon)
- yeast
Let sit 5–10 minutes until foamy.
3. Mix the dough
In a large bowl, combine:
- flour
- salt
- cinnamon
- crushed anise
Add:
- yeast mixture
- softened lard
- egg (if using)
HEY. Pause. Important moment.
Do not forget to add the piloncillo syrup here. Don’t be like me.
Pour in the remaining piloncillo syrup and mix until a soft dough forms. If you are wanting a bit of a glaze afterwards, keep some back and see how your dough feels, add in water if too dry.
Fold in the raisins.
4. Knead
Knead for 8–10 minutes until:
- smooth
- elastic
- slightly soft but not sticky
5. First rise
Place in a bowl, cover, and let rise 1–1½ hours until doubled.
6. Shape
Divide into 10–12 pieces and shape into rounds or small ovals.
Place on a baking sheet.
7. Second rise
Let rise 30–45 minutes until puffy.
8. Bake
Bake at 190°C (375°F) for 15–18 minutes until:
- golden brown
- lightly firm on top
9. Optional finish (but highly recommend)
Brush warm rolls with a little extra piloncillo syrup for shine and a soft, slightly sticky top.
Notes
- If your dough feels too dry, add liquid 1 tablespoon at a time
- If too sticky, lightly dust with flour while kneading
- The egg is not strictly traditional, but helps create a softer, more modern texture
- For a more rustic version, skip the glaze

Leave a comment