There is something about making your own cheese that feels a little dramatic. Like you are suddenly a ranchera in 1857, standing over a pot of warm milk, watching it transform into something completely different in front of you.
I had never made cheese before, and I fully expected this to be complicated or at least a little fussy. It was not. It was shockingly simple. And the result was so good. Rich, creamy, just a little tangy. The kind of thing that makes you pause mid bite because you did not expect it to taste that creamy.
What surprised me most was how much milk it takes to get a small round of cheese. It feels excessive at first. But in 1857 Mexico, especially in more rural and ranching regions, that tradeoff made sense. This is the kind of food that sits quietly in the background of daily life. It was not the main event. It showed up alongside beans, tucked into tortillas, crumbled over simple meals to add richness and protein. It made humble food feel a little more complete. For families with access to dairy, it was an easy way to stretch nutrition without relying on expensive or hard to access ingredients.
And in true waste not fashion, nothing got tossed. That leftover whey would have gone straight into other cooking. Bread, drinks, soups. You use it because you have it. That mindset alone makes this dish feel very 1857.
I do not know that I will be making cheese every week. It does use a lot of milk for what you get. But as a one off or when you want something that actually tastes fresh and creamy, this is worth it. It is simple, a little magical, and honestly kind of fun.
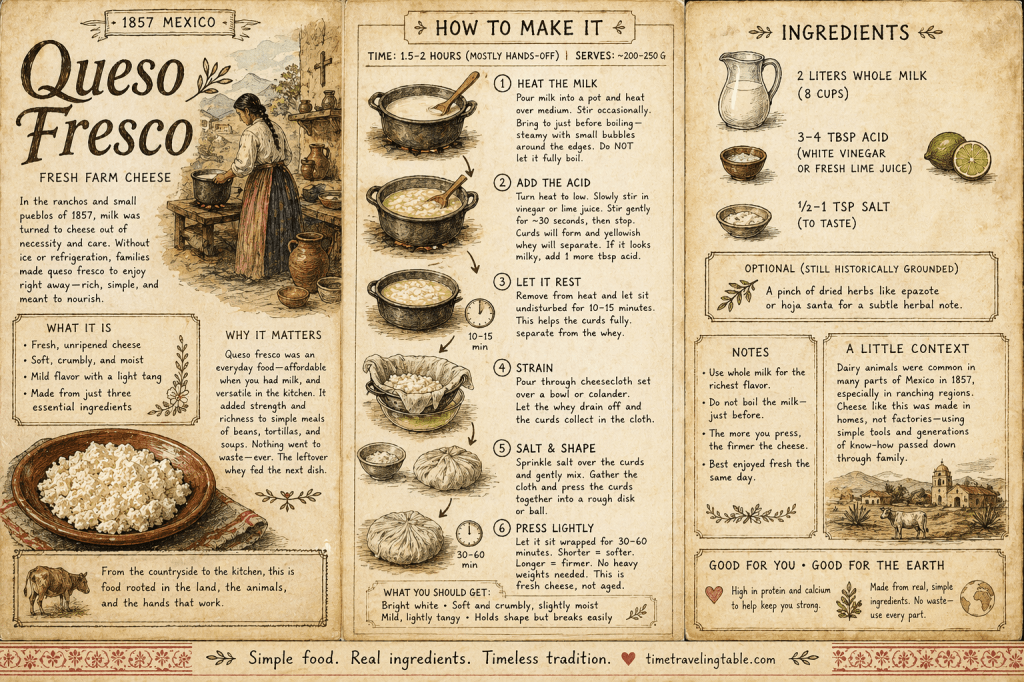
Queso Fresco (Fresh Farm Cheese)
Servings: ~200–250 g cheese (about 1 to 1¼ cups crumbled)
Estimated Time: ~1.5–2 hours total
- Prep: 10 minutes
- Cook: 20 minutes
- Rest & drain: 60–90 minutes
Ingredients
- 2 liters whole milk (8 cups)
- 45–60 ml acid (3–4 tbsp white vinegar or fresh lime juice)
- 3–5 g salt (1/2–1 tsp, to taste)
Note on ingredients
Milk matters! Use whole milk, not ultra-pasteurized. Ultra-pasteurized can work, but curds may be weaker
Lime vs vinegar: Lime has a slightly more traditional flavor while vinegar has a more reliable, cleaner set.
Instructions
1. Heat the milk
Pour the milk into a large pot and heat over medium.
Stir occasionally to prevent scorching.
Bring it to just before boiling. You are looking for steam and small bubbles around the edges. Do not let it fully boil.
2. Add the acid
Reduce heat to low. Slowly stir in the vinegar or lime juice.
Stir gently for about 30 seconds, then stop and let it sit.
You should see soft white curds forming and a yellowish liquid separating. If it still looks milky, add another tablespoon of acid and give it a gentle stir.
3. Let it rest
Remove from heat and let the mixture sit undisturbed for 10–15 minutes.
This helps the curds fully separate from the whey.
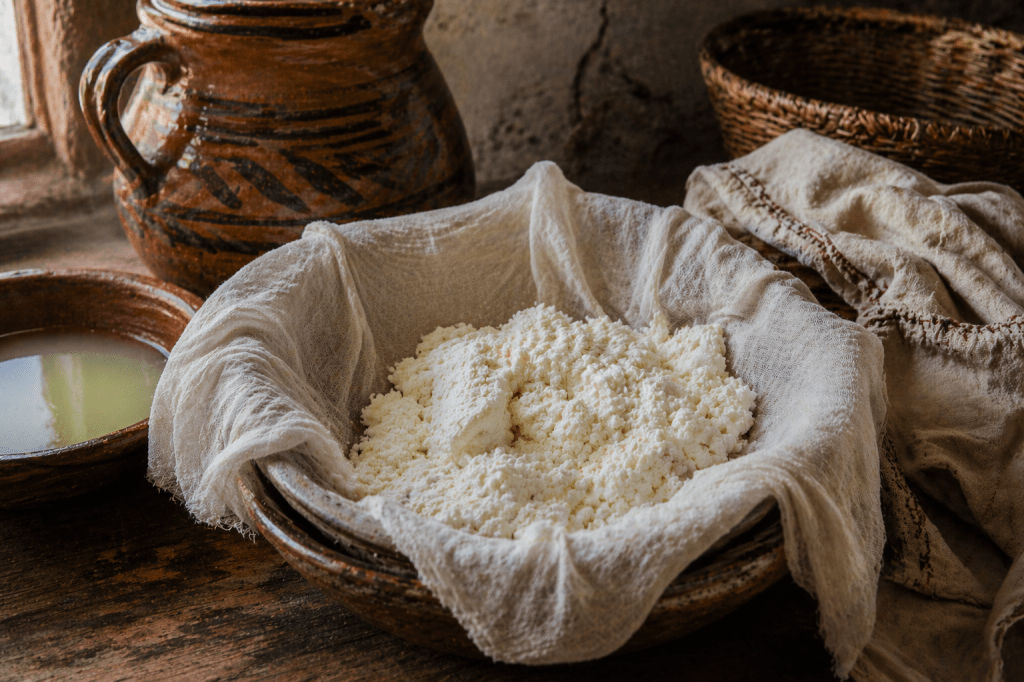
4. Strain
Place cheesecloth or a clean kitchen towel over a strainer set on top of a bowl.
Pour the mixture through. The curds will collect in the cloth while the whey drains into the bowl below.
5. Salt and shape
Sprinkle salt over the curds and gently mix.
Gather the cloth and press the curds together into a rough disk or ball.
6. Press lightly
Let the cheese sit wrapped for 30–60 minutes.
Shorter time gives you a softer, more spreadable cheese. Longer time gives you a firmer, more crumbly texture.
No heavy weights needed. This is a fresh cheese, not aged.
Storage
• Fridge, covered: up to 3–4 days
• Best eaten fresh (day 1–2)
Don’t Waste the Whey!
If you make this, you are going to end up with a lot of leftover whey. Like… a surprising amount. It feels wrong to toss it, and in 1857, that would not have even been an option.
Whey still has protein, minerals, and a light tangy flavor, so it was used as a base for other foods instead of plain water. Think of it less like a byproduct and more like a bonus ingredient.
Here are some easy ways to use it:
1. Use it in place of water when cooking beans
This is probably the most historically accurate move.
Swap whey for part or all of the cooking liquid in your frijoles de olla. It adds a subtle richness and depth without overpowering the beans.
2. Add it to soups or broths
Perfect for simple caldos like your vegetable soup.
Use it as part of the liquid base to add body and a slight tang.
3. Make rustic breads or doughs
Use whey instead of water when making:
- simple pan-style breads
- tortillas de harina
- or even early-style rolls
It adds softness and a little extra flavor.
4. Cook grains in it
Rice or other grains absorb the whey and take on a slightly richer taste.
Try replacing part of the water when making arroz rojo or plain rice.
5. Blend into smoothies or drinks (modern option)
Not historical, but very practical.
It works especially well with fruit because of the slight tang.
6. Use it for soaking or softening
Historically, whey could be used to:
- soak grains
- soften dried ingredients
- or even as part of simple fermentation processes
If nothing else, even using it once instead of dumping it already puts you closer to how people actually cooked in this time period. You use what you have because you worked for it.

Leave a comment